Monday, December 2, 2019

Where to Have a Victorian Christmas in Dallas-Fort Worth

We here in the DFW Metroplex are super lucky when it comes to Victorian-themed Christmas events - we have a ton of them! From festivals at historical parks, teas, dinners, and more, there's a Victorian Christmas event to suit everyone's needs! We've gathered a list of everything we could find so you can plan your holiday outings this season.


The Farmer's Branch Historical Park has an extensive list of holiday events centered around their collection of historical buildings. While not all of them are Victorian themed, most of them would be perfect to tailor a costumed outing around. We're especially excited about the "Dickens of a Dinner" which includes a traditional Victorian Christmas dinner and dessert.

Skating Under the Stars - November 29 - January 17 - $10 admission, $5 skate rental Bah! Humbug! Children's Christmas - December 6 - $2/person
Dickens of a Christmas Exhibit Tours - Fridays & Saturdays in December before Christmas - Free
A Christmas Carol Teas - December 7, 14 - $40/person
Christmas Tree Lighting and Holiday Market - December 7 - Free
A Dickens of a Dinner - December 13 - $50/person

Lantern Light at Plano Heritage Village has been one of our favorite events for years. This year they're shifting from Victorian Christmas to a 1920s theme, and will highlight innovations achieved during that decade. Other events include a tour of the historic home, storytelling, choir performances, children's crafts, and photos with Santa.

December 7 - $5 in advance, or $6 at the door

Nash Farm in Grapevine offers a slew of Christmas events this season, and all of them are extremely popular. Grapevine itself bills itself as the "Christmas Capital of Texas", and crowds head there every weekend for some holiday cheer. If you want to attend one of these events, it's best to get tickets well in advance, as many sell out quickly.

Christmas Parlor Sociable - December 20 - $15
Tales of a Victorian Christmas - December 21 - $5


Candlelight at Dallas Heritage Village has been running for a long time - this will be it's 42nd year! The festival features strolling carolers, musical performances, food trucks, and Christmas crafts.

December 14-15 - $12 in advance, $14 at the door


The Victorian Luncheon and Tour of Historic Homes in Waxahachie is a private event hosted by local costumer Laura Goss, and is geared toward historical costumers, which instantly bumps it up our list. Guests will first enjoy lunch at the historic (and haunted!) Catfish Plantation restaurant, which is housed in a beautiful 1895 home, before enjoying the Historic Waxahachie Christmas Tour of Homes. RSVPs are required, and tickets to the tour need to be purchased in advance.

December 14 - RSVP on Facebook - $20 for tour tickets

___________________________________________________________________________________

Know of any other Victorian-themed Christmas events happening around DFW? We'd love to hear from you! Comment below, and we'll add it to the list!

Friday, July 12, 2019

An Overview of 1830s Fashions

The 1830s are hot this year, and the Guild is planning it's first ever 1830s picnic for next spring! For those unfamiliar with this fun and wacky period of fashion history, here's a quick rundown of what Romantic period clothing looks like, specifically the period covered by our picnic.

1825 - 1830

We're just starting to see the transition away from the columnar styles of the Regency to the fluffier looks of later decades. Skirts are only slightly fuller at first, but sleeves are starting to gain volume. The waistline is starting to creep downward, but is still higher than the natural waist. Dresses are more highly embellished with ruffles, trims, fabric manipulation, and other decorations. 

Museum of Fine Arts, Boston
Dress, American, c.1825

As the decade comes to a close, the skirts gradually become fuller, and the sleeves gain volume. The waistline is still worn high, but it moves closer to the natural waist, and is tied with a sash or belt. Embellishment slowly decreases on the skirt and more focus is placed on the bodice.

The Met Museum
Dress, 1826-1829


The Met Museum
Morning Dress, 1827-1830

1830 - 1834

Skirts and sleeves become very full. The waistline sits just above the natural waist, and is often worn with a sash or belt with a large buckle. The neckline grows wider and lower, with the sleeves worn off-shoulder. The full sleeves, called Gigot sleeves, were supported with stuffed or boned sleeve supports called "plumpers". Skirts gradually become wider and fuller, but are shorter than previous decades, ending at the ankle. 

Victoria & Albert Museum
Printed cotton day dress, 1830-1834

Bodices come in a variety of flavors. Plain bodies are common (see above), as are pleated and gathered bodices.

Dress with Gathered Bodice
Met Museum, 1832

Silk day dress with pleated bodice, c.1830
The Met Museum

When outside of the house, bonnets and pelerines (also called capes) are worn to protect the skin. Fashionable bonnets had tall crowns to accommodate the escalating hairstyles of the time. Pelerines were wide to cover the shoulders. They could be made of the same material as the gown, or they could be made of delicate embroidered lace. 

Printed Cotton Dress with matching pelerine
Augusta Auctions

Pelerine of embroidered tabby, 1825-1835
Augusta Auctions

1835

Pleats really started playing a big role in fashions during the latter half of the 1830s. Sleeves, bodices, and skirts could all feature decorative pleating. The sleeve would still be cut with the same pattern, but some of the fullness might be taken out at the sleeve head by use of decorative pleating. Necklines grew even wider and lower. 

Met Museum
American Wool and Silk Afternoon Dress, 1835

The Met Museum
Evening dress, c.1835

1836 - 1839

In 1836 fashion changed dramatically. The enormous voluminous sleeves that had been so popular were pleated down both above and below the elbow, leaving only a portion of the sleeve at it's fullness. Bodice styles and skirt lengths remained unchanged, only the sleeve suffered its fashion defeat.

The Met Museum
Dress c.1836

As the decade went on, skirts dropped to floor length again. Necklines were still open, but started to slowly move upward again, away from the drastically wide styles that had been popular only a few years before. Pointed waistlines started to come back into fashion.

Philadelphia Museum of Art
Woman's dress c. 1837

Philadelphia Museum of Art
Dress c.1838


As the 1840s approached, the focus shifted from soft round shapes to creating "long, pointed Gothic angles" (C. Willett Cunnington). Skirts remained full and floor length. Sleeves could retain some lower fullness, but continued to deflate. Bodices were close fitted and fanned gathering and pleating remained popular.

The Met Museum
Dress, 1840s
Museum of Fine Arts, Boston
Dress, American, c.1840

Get The Look

Ready to make your own 1830s outfit? We have compiled a list of great resources that will get you started on your journey!

First and foremost, Workwoman's Guide by A Lady published in 1838, is the best primary source for 1830s fashions and patterns. The book is full of instructions, diagrams, patterns, and drafting instructions which will help you create an entire outfit from the inside out. The book has been uploaded online, and is available for free through Google Books!

The American Duchess "Sewing is Hard" YouTube series has several videos about 1830s costume:

Patterns and Tutorials:

  • Laughing Moon has a pattern for Regency and Romantic era stays
  • Black Snail Patterns also has a pattern packet for 1830s undies that includes stays, chemise, corded petticoat, and sleeve plumpers.
  • Redthreaded makes beautiful 1830s stays if you don't feel like tackling them yourself.
  • Truly Victorian's 1830s dress pattern has rave reviews and produces beautiful results.
  • Past Patterns has a wide selection of Romantic Era patterns for both men and women.
  • Historical Sewing has a workbook available for making Corded Petticoats.
  • Amazon Dry Goods carries several patterns for the period. The patterns aren't sorted by year, though, so you'll have to look through each page on their site. 
  • Butterick B5832 is a decent late-1830s/early-1840s look. The bodice pleating is weirdly asymmetrical, which would need to be altered to achieve a more correct period look.
  • McCall's new M7988 from Angela Clayton is a fun 1840s dress, which could be adapted for early styles. 

Other Bloggers:

It's always helpful to read about what other costumers have done in constructing their own ensembles. Here's a compilation of the blog posts we've found most helpful.


Tuesday, June 27, 2017

Getting a Start on 18th Century Undies

Our first Summer Salon is just around the corner, and we'll be taking that day to focus on starting our 18th Century wardrobes from the inside out, by creating the foundation garments we'll need to support our ensembles!

For a basic 18th Century outfit you'll need a few essential undies, which we'll give you a rundown of in this post. We'll also give you a list of readily available patterns for all skill levels, so you can start gathering your materials and getting ready for our sewing day!  And don't worry if you're feeling a little overwhelmed at first. If you're costuming the 18th century for the first time, starting from the ground up is the best way to build your wardrobe, and our resident 18th century costumers will be available to help you if you get stuck.

The innermost layer is called the "shift" and was worn against the skin to protect the upper layers from body oils and sweat. This was usually made of linen, since it was widely available and could be inexpensive. Cotton muslin is today's equivalent. Shifts were fairly simple garments, falling to mid-calf, with lightly gathered sleeves that were finished with a cuff.


The next layer would be the stays, which shaped the body into the fashionable conical form, and provided a canvas on which the dress could be pinned. While most people think of stays as corsets, and they were boned with supporting materials, their function was to provide support for the bust, create a fashionable silhouette, and importantly, to provide support for the skirts by redistributing their weight from the waist to the torso.


 To provide a fashionable shape to her skirts, a lady had a couple of different options for skirt supports. During the first half of the century, panniers were the fashionable support of choice. They created the wide, flat silhouette that we see for a large portion of the 18th century. They were often constructed in the form of a skirt boned with reeds that was tied to shape with tapes.


Later, the fashionable shape the panniers gave was created by wearing "pocket hoops". These created the same shape to the skirts, but were somewhat lighter and more maneuverable.


If you noticed above, both of the skirt supports are worn underneath the stays. This helps prevent the skirt supports from shifting around or riding up.

During the last quarter of the century, the flat and wide silhouette gradually shifted to the back and was replaced with a bumpad or bumroll. These could be made of a variety of materials, from stuffed fabric rolls to carved cork.  We see the bumpad look in a lot of film and tv at the moment, even in shows set before the bumpad became popular!


With these basic garments, and a couple of petticoats, you can start building your 18th century wardrobe! But where do you go for patterns or instructions? We have a short list of readily available resources for you to check out! This list is by no means exhaustive, but these are the most freely available patterns and instructions we could find.


For Beginners: 

-  The new Simplicity #8162, 18th Century undies pattern, includes the shift, stays, and bumroll appropriate for late 18th century fashions.

-  Simplicity also has an older, out of print pattern that includes a shift, stays, pockets, and panniers. While Simplicity #3635 is out of print now, it can found fairly easily on ebay and etsy.

-  Simplicity's Pirates of the Caribbean inspired pattern, Simplicity #4092, includes a pattern for a pair of pocket hoops, as does their new 18th century dress pattern, Simplicity #8411.

-  The discontinued Butterick #4484 includes stays, large pocket hoops, pockets, and petticoat patterns. This pattern can still be found online on ebay and etsy.

Intermediate Difficulty:

JP Ryan's half-boned stays are a favourite among Rev War reenactors, as are their strapless stays.

-  The Larkin & Smith front and back lacing stays pattern is also very popular and highly recommended.

Advanced Difficulty:

For those comfortable with sizing up, drafting, or draping their own pieces, there are a few great online sources for making various underthings:

18th Century Shifts by Sharon Burnston is pretty much the shift-making bible. It will give you cutting layouts, fabric lengths, and variations for different decades, and her research is top notch.

-  The Marquise's website has been around for nearly two decades, and is still a go-to resource for 18th century costuming. In her How-To section, you can find instructions for shifts, stays, panniers (with variations for different decades), and much more. Definitely look around her site for lots of great information.

-  If you have a copy of the book Corsets & Crinolines, it includes several 18th century stays patterns, as well as a pattern for a grand pannier. If you don't have the book, most of the patterns are available through a simple google or pinterest search.

-  Katharine of Koshka the Cat has a free tutorial on how to create an easy, authentic 18th century petticoat.


If this is your first foray into 18th century costuming, we hope we've provided a helpful guide to get you started on creating your underpinnings! If you plan to join us for our Underpinnings workshop, feel free to start on your projects ahead of time, you don't have to wait for the class to begin work on your outfits. If you get stuck, we'll have some of our resident 18th century gurus at the class to help you out.


There will be enough outlets for 12 sewing machines, so feel free to bring yours along. We'll also have a handful of mannequins available in case you need to use one.  We hope to see you at our workshop in July!

Monday, April 20, 2015

New Officers!

Our officer elections are now over, and we are excited to announce our two new officers!

First, we welcome Megan Martin aboard as our new President! She has been into historical costuming since childhood, and has been a member of the DFWCG since 2011.


We also have a brand new treasurer, Beth Klimek! Beth has been a member of the DFWCG for many years, and has created some truly beautiful costumes.


We want to thank our outgoing officers, Jen Thompson and Jay Ragan, for all their hard work during their time in office. They have helped make the Guild the great organization that it is today! It will be exciting to see what this new year brings!


Sunday, February 22, 2015

Burning out velvet

One of our members recently attempted to burn out her own velvet. These are her experiences.

Burning out velvet
by Sandi Dreer

OMG! I'm going to be destroying this fabric! Who in their right or wrong mind would deliberately do this to velvet? Lovely, sumptuous velvet?

Me.

My youngest daughter's latest costume from an episode of Doctor Who demanded that the velvet be burned out. And it couldn't be purchased already burned out because the burnout appears on all the gores of the gown. In lovely points in each gore. And above the hem by about an inch. The velvet used for this project was a Chinese silk velvet that is made up from 23% silk fibers and 77% rayon.

My first step was scouring the internet and finding one (yes, just one) tutorial on burning out velvet. But that tutorial directed me to Dharma Trading and a product they carry called "Fiber Etch".

Just like glass etching takes off a layer of glass, Fiber Etch removes the silk fibers from silk velvet. There is a great video to watch on the Dharma Trading website too. Fiber Etch is a heat activated product.

Steps in using Fiber Etch
  1. Use in a well ventilated area as the product does have an odor. I thought it was a slight odor but it could be stronger for different people. Plus, this is a chemical, so follow all the precautions.
  2. Cover your work area. We used my cutting table and taped some waxed paper on it. This prevented any chemicals from possibly hurting my cutting table.
  3. Use a paint brush you don't mind throwing away afterwards. We knew we wouldn't be able to complete the entire project in one sitting, so we periodically covered a small glass that held the Fiber Etch with plastic wrap.
  4. The fabric didn't need any special preparations. Simply place it where it is convenient to your workspace. Be sure to place the fabric right side down
  5. Using a stencil (or freehand if you're really talented in that area), paint on the Fiber Etch. The video I mentioned before used a foam brush, but I used a craft brush that was about 1/2" wide. I felt that a foam brush would loose too much of the chemical. The Fiber Etch will remove the velvet fibers where you apply it. So be aware of what kind of design you wish - you wouldn't want to have a reversed image by mistake.
  6. Allow the Fiber Etch to completely dry.
  7. Apply heat. My first attempt to apply heat to complete the process was to place the gown into my dryer. That was almost a complete failure. The chemical did not completely activate. So, out came my iron. Be very careful here when your burning out velvet! Do not place the iron completely on your project. The Fiber Etch will darken when the chemical has activated. 
  8. Remove the fibers. The directions stated to wash your project and I was leery of placing the velvet into the washer. But I did in cold water and it really worked. The softness of the velvet was only slightly affected and there was no shrinkage.
  9. Dry your project. If you have the freedom to allow your project to air dry, do so. I tossed our project into the dryer on a low heat.

Painting on the Fiber Etch

First layer of Fiber Etch on, moved stencil for next location

Finished velvet burnout


Tuesday, December 9, 2014

Star Wars Mandalorian Breastplate Armor Tutorial by Matt Ragan

Originally posted as "Kuu's 'Darts' Method Legacy Armor Tutorial" on the Mandalorian Mercs Costume Club forums, by Matt Ragan.

This is a tutorial that describes how I created these two Legacy armor breastplates using 3mm Sintra (Closed Cell Foam PVC, a heat-formable pvc plastic), for ladies that have anatomy that requires the build materials to yield very compound curves.

... i.e. "big boobs"


The Yellow Armor (Maelie)


The Silver Armor (Jaelie)


Create/Customize Pattern

Tools Needed for this Section
1 ) Your undergarments, and armor vest
2 ) Pen or Permanent Marker
3 ) Masking Tape
4 ) Poster Board
5 ) Measuring Tape

Steps for Method 1
1 ) Put on all your supporting garments and vest.
2 ) Use masking tape to cover 1/2 of your torso area where you will want the breastplate to be.
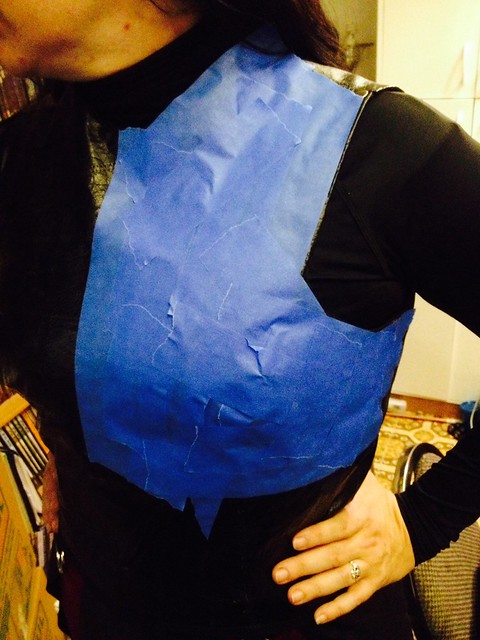

3 ) Use a marker to draw a centerline, and then trace the outer line of your desired armor.
4 ) Go in and mark where the darts will be with a single line.


5 ) Remove masking tape carefully
6 ) Cut "dart" lines and lay the pattern flat on posterboard or scrap paper
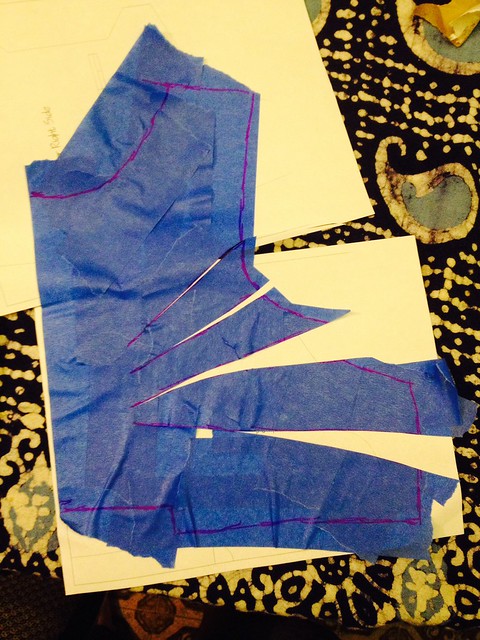

7 ) widen your darts by a few milimeters (if using 3mm sintra, add 1-2 mm to the dart width).
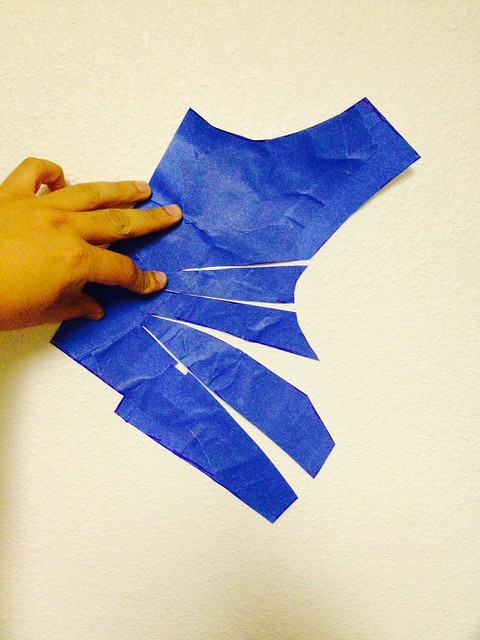

8 ) Redraw the pattern on posterboard (smoothing out your lines/cleaning up).

Steps for Method 2


1 ) Put on all your supporting garments and vest.
2 ) Measurement A is across the point of the bust and goes back towards the armpit however far as you want the armor plus about 1 inch for slop (I cut off about that much to even everything up later)
3 ) Measurement B is from the "A" line (point of bust) down to wherever you want the bottom to be. In Maelie's case it was basically back to the ribcage. Don't curve "up" (i.e. that place from whence boobsweat originates, the area under your breast/up against your ribcage - it's not a bra or bikini) with your measuring tape, if anything curve down to go with the flow of the armor plate (when you're done the goal is a graceful-ish line from your chest into your belly plates). No need to add anything to the measurement here.
4 ) Measurement C is across the top of the main breast mass, armpit to armpit. No need to add any extra inches here as you'll be sanding/cutting away anyway.
5 ) Measurement D is from top of shoulder (wherever you want the top of the armor to be) down to point of bust.
6 ) I then just kinda drew a freehand curvy line to connect those points. I only made half the pattern (i.e. the center is a straight vertical line), I then flipped it and traced it again to make the armor itself.
7 ) Then go in and draw triangular "darts" - I just eyeballed it - the point of the triangle should be just on the other side of the point of your bust (i.e. closer to your sternum than armpit)
8 ) The Purple E - is just where I discovered that, after forming the other "fingers" (as Maelie called them) I had to cut that one basically to a nub to get it to fit.
9 ) I made a pattern half, so I divided all the horizontal measurements (A & C) in half. If you don't want to do math, do the full thing.

Cut Out

Tools Needed for this Section
1 ) 3mm Sintra (or whatever you're using)
2 ) Pen or Permanent Marker
3 ) Something to cut whatever you're using


1 ) Take your pattern and trace it on to the Sintra (I found 3mm to be SO much easier to work with).
2 ) if you did a half pattern, Flip on the vertical line and draw the other half. I found that by doing it this way, I get it more symmetrical.
3 ) Cut out your Sintra however you prefer and sand the edges lightly. I used a band saw for everything except the center diamond, for that I used a hobby knife (just go over your lines several times, pushing lightly and it'll come out. The Sintra is soft)

Positive Forms

Tools Needed For This Section
1 ) Ehm... a credit card and access to Amazon?
2 ) Clear Plastic Fillable Ornaments

I used fillable Christmas Ornaments as my positive forms. Take a ruler to your most comfortable Underwire Bra and get a ballpark diameter of the wire itself, this is the diameter ball that you'll need.

For Maelie I used 120mm ornament (she wears a 34G US/34H UK), for Jaelie 100mm (34E US/34F UK). It can be small by an inch or more as the "mono-boob" (aka "sports bra") style will give you some flex with your measurements. Get close, but don't stress it if it's not exactly the same size as your underwire.

NOTE: Depending on how hot you like to get your Sintra, you may want to reinforce your positive mold. The colder you prefer to leave your Sintra, the stronger you'll need the form to be. I just poured Plaster of Paris into one of mine... now I have a weapon. If you are willing to run hotter Sintra (and wear a glove or whatever) you won't need this kind of reinforcement. If you use 6mm Sintra, reinforce your spheres.

Basic Forming of The "Fingers" (between the darts) using Heat Gun

Tools Needed For This Section
1 ) Heat Gun
2 ) Gloves
3 ) Your positive form
4 ) Your cut out armor
5 ) Your clothing on... ignore whatever your significant other says. You'll need to put the Sintra up to your body from time to time to check and it can still be uncomfortably warm.


Imagine each of these ornament halves flat side down on a table. This picture just gives you a general idea of how it'll look.

1 ) Heat up a single triangular "Finger" section (I went from the bottom, up to the armpit)
2 ) Form it over your positive form. Push down on all the corners and whatnot to try and get as smooth as shape as you can.
3 ) Repeat for all "Fingers" going around the spherical positive form.

~ ) When all your Darts are finished, form your shoulders and the rest of the breastplate as best you can. I preferred a straight plane down to the point of bust, but it's up to you really.

Fine Tuning Using Spacers

Tools Needed For This Section
1 ) Superglue
2 ) Little snips and scraps of Sintra
3 ) Masking tape
4 ) A friend you trust and/or like a lot...


You will notice that the individual "fingers" (Maelie's term) formed by the curved darts are springy and will not hold to your individual shape.

1 ) Get a friend you like well enough to let them play around near your chest (very up close and personal operation this... you can do it yourself, but it's harder).
2 ) Cut small rectangles of Sintra.
3 ) You'll need to insert those Sintra "spacers" in and around the edges of the "fingers" until the structure starts to stabilize. Use tape to hold them down.
4 ) When all the spacers are in, use a drop of superglue to "lock" each one in place.

The breastplate is starting to get rigid now/less springy.

Fiberglass and Resin

Tools Needed For This Section
1 ) Fiberglass Resin and Resin Hardening Drops (i.e. found in a Bondo Repair Kit or can be purchased separately)
2 ) Scissors
3 ) Cheap crappy paintbrush you're okay with destroying
4 ) Plastic cup you're going to throw away afterwards


1 ) Purchase a Bondo automotive repair kit.
2 ) Cut long strips of fiberglass the width of your gaps.
3 ) Put a single drop of superglue somewhere on the Sintra and "lock" the strip of Fiberglass in place. You just need it to not float around until you can pour the resin.
4 ) Mix up the Resin (I've found you don't need to be all that precise with ratios.... just remember, the more Drops of Hardener, the faster you need to work
5 ) Slather the resin onto your Fiberglass strips with the old paintbrush. You don't need to be precise, just slather it on there and get a good coating in place.

NOTE - Optionally you can follow the Bondo directions (mix resin, dip strip of fiberglass in resin, put strip in place) but I found it was very messy and wasted a tremendous amount of resin.

Now go away for an hour or two. Even better come back tomorrow. No really.

After the resin cures, it'll look a bit like this.


If you've got pokey bits on the inside (maybe the superglue hardened the fiberglass into a sharp pokey bit) just cut them off with a razor blade. If it's still pokey you can cover all this with Duct Tape when you're done. Maelie used Pink Duct Tape. It's pretty epic.

Bondo

Tools Needed For This Section
1 ) Something to mix the Bondo on (Silicone cookie sheet, foil, whatever) - a big flat surface is best.
2 ) 1 1/2" wide paint scraper (metal blade is best)
3 ) Something to scoop Bondo with (plastic spoon is fine... don't touch raw Bondo with anything else. It'll contaminate it and cause it to harden prematurely. Only scoop bondo with this spoon.)
4 ) Bondo "Body Filler" (not Putty or whatever else, basic red label Bondo Body Filler) and Red Cream Hardening Paste (both come in a Bondo Repair kit or can be purchased separately)
5 ) Good air circulation... or do this outside is best.


1 ) Scoop out the raw Bondo and drop it on your mixing surface (flat is best)
2 ) Squirt in some Red Cream Hardening agent (so the label tells you the ratio is this or that... piffle. Just remember "the pinker your Bondo the faster it hardens" ... that's it. A nice Salmon paste color hardens in just under 10 minutes so be quick.)
3 ) Mix it fast using your paint scraper. Smoosh it all around and get it mixed up. Pretend it's toxic cake icing.
4 ) Use the paint scraper to shove it into the holes.
5 ) Try to get it "smooth" ... but don't worry overmuch. You'll be sanding it anyway.

This is what it looks like from the resin side.


Now let it dry. No really, I know it's cool and you want to poke at it... leave it the heck alone for like 2 hours or more. Go watch one of the Star Wars movies or something. Best would be overnight. Bondo is hard on the outside after an hour or two, but chances are very good it's still uncured towards the center.

Sanding

Tools Needed For This Section
1 ) Palm Sander or whatever (you'll need both a "course" 80 or so grit and a "fine" 120-200 or so grit)
2 ) Patience
3 ) a sheet of 400 grit sandpaper


So you just sand it. You're going for no major ridges or high spots with the course sandpaper... then switch to the fine and do the rest.

You'll get it close and realize there are gaps and ridges and whatnot that you missed somehow (and you'll be certain you had gotten them all... right up until another gap pops up, like a weed). Like this:


So... Bondo again. Rinse and repeat.

Eventually you'll get fed up or be happy with the results (or both). If you have it you can switch to 400 grit sandpaper and finish up by hand... use sandpaper on your bare hand so its organic. Any gaps or pits at this point will become battle damage when you paint it so don't stress.


At this point, you have enough fiberglass and bondo on your armor that I call them "Fenders" ... Front Fenders to be exact, over near your headlights you see? Oh come on, you're making a breastplate... boob jokes are mandatory. Too serious and it all becomes a terrible chore... either that or I sniffed too much Bondo.

Trim

Tools Needed For This Step
1 ) Saw or Dremel


Now even up the edges to where you're happy with it.

That's more or less it really. Enjoy.

I attached the collar bit and the lames (horizontal belly bits) to the breastplate. You can use whatever pattern you like for those.

Maelie (black & yellow), Little Mando, Luke, Leia, and Jaelie (silver & black):


Jaelie's breastplate, after painting:


These same techniques could be used to construct fantasy armor, too.