Monday, October 3, 2011

Gearing up for Georgian! {18th century November Picnic}

Our 3rd annual Georgian Picnic is just around the corner! (Nov 19th) This is a small post hoping to spread some enthusiasm and ideas to get you started or keep you going on your 18th century costuming :)

Of course, like all of our events, costumes are not required...but gosh it makes it all the more fun!

Our first year we decided to expand the title of the picnic to "Georgian" to incorporate a number of silhouettes of this time period. We usually have everything from panniers and bum pads to sleek lines of the regency period.

There are a number of great tutorials and commercial patterns out there to get you started. I have personally used a few different patterns from commercial sellers that I think have worked quite well. Mill Farms has been easy for me to use and I have fashioned a few different jackets from their $10 pattern.

Below is my mill farm jacket at the first picnic (and as you can see with my bright pink...you don't have to be historically accurate hehe)

Fellow around the web costumer Koshka-the-Cat has a fabulous tutorial for petitcoats similar to the one above:

That jacket and petticoat are a basic and good start to the 18th century.
I have also used Sense and Sensibility patterns for regency era and found that they are easy to use...I am a more advanced sewer but I think both of these patterns (the Mill Farms and Sense and Sensibility patterns) are good for a beginner-intermediate.

As for the men: I have used the Rocking Horse Farm 1795-1820 Tailcoat pattern
...as the pattern suggests, its not for a beginner. But a great alternative costume for men that is simple would be a pirate type shirt, slim-fit khaki pants, and a vest of some sort....all of these could be found at a thrift-store (which is my favorite place to quickly refashion costumes and stay on a budget)

Now for accessories. Accessories can really put the final touches on any costume. 
Think about first: the top side..meaning your hair or a hat. Most ladies and gentleman wore some type of hat for this time period. 
If you go early think about a wide brimmed straw hat with a low crown for ladies. Pretty faux flowers and ribbons are great decoration. Poke bonnets work well for the Regency era. Hair is either worn up (really high and big or curled back, sometimes hidden under a mob cab)

As for the gentlemen: Top hats or tricorns are great for this period...or think George Washington hair ;)

Mitts are another great accessory which I am thinking I will be making this year (if I can get to it in time)... A great example is from Cynthia G. at www.cfgriffth.com... check out her costume galleries page for the entire 18th century outfit she finished this year! Its charming!!!...GREAT ACCESSORIES!

Be sure to check out our groups flickr pages from previous picnics for other great ideas:

Hope to see new and old faces next month at the event!
<3 Kaycee

Thursday, September 15, 2011

AnimeFest 2011 & Beaded Pixel Art

Labor Day weekend I had the great pleasure to represent the DFW Costumers Guild at Anime Fest alongside fellow members Jennifer K and Gypsy James.  We had an absolute Ball!!!!  

Jennifer and James helped to judge the Friday night costume contest.  When I met up with them on Saturday I heard all about some of the beautiful costumes they were treated to by the costume entrants.  On Saturday we all three participated in judging the Hall Cosplay Contest.  Again, we were just mesmerized at the skill level and beauty of some of the costumes presented before us.  And in this case, we were able to ask questions of the entrants and we came away with some new Brilliant ideas for prop making ourselves.  I have to say that if you are looking for innovation and smart problem solving, I have recently learned that I need to look no further than our local Anime cosplayers.  

After the Hall Cosplay Contest on Saturday, I was off to present my Pixel Art Bead Jewelry panel.  Wow, I had anticipated that I would have more people show up than I had tools to provide, but I had no idea that the number of people attending the panel would exceed the number of handouts I had made.  We had between 40 and 45 participants in my panel.  I was really surprised.  And a little flustered over being able to accomplish any of my intended pieces.  Originally, I had pre-made patterns that I was going to let people choose which one to make, but there was just no way any of those pieces was going to get made in an hour with me having to go around the room group by group handing out supplies and teaching people the very simple method of stringing these beads.  So I changed the plan.  Instead of making one of the pre-selected patterns, I quickly explained to the panel how to make their own much smaller square pattern.  Below is an example of the type of pattern we switched to.  This pattern along with the patterns on my original hand out is available in the above patterns link.


Thankfully pixel art is an easy concept to understand and people caught on very well.  I am also thankful that a very helpful panel attendee offered to cut wire and pass out beads with me.  She made my job a lot easier!  Most of the panel was spent teaching different groups how to start their project.  Some people finished, some people barely got started.  I wish everyone could have finished their project, but I hope at least everyone came away with a good idea of how to start their own project and the confidence that they can finish something fun and crafty in a short period of time. 

Sunday was another day that my fellow guild judges and I had a great time together!  We were all back together again for the Cosplay Skit competition.  We had so much fun with that one!!!!  And we had enough awards to hand out that each of our favorites won something.  It was a great way to end our participation in this fun Con!

In my panel on Saturday I promised those who didn't get a pattern handout that I would post a blog with my patterns and step by step instructions.  I apologize that it has taken me this long to get this blog put together. But I hope that now any of you who had questions and didn't get to ask me because I was helping others will see this and have those questions answered.  If you still have questions after this blog, please put them in the comments.  I'll be sure to answer them for you.

Now, this whole idea of the panel came from my trying to re-create some Luna Lovegood jewelry for the last Harry Potter screening.  The DFW Costumers Guild gathered at Studio Movie Grill on opening weekend in costume and I wanted to make sure I had the right jewelry.  I made radish earrings and the beetle ring.  I was really surprised at how easy it was to put those things together and I thought it would be a fun activity for a con panel.  I figured there was a whole world of possibilities with seed beads and pixel art! I was right.  But there were very few people online making pixel art with seed beads.  The only one I saw was this person and it looked like they had the same idea I did of using the bead sprite pattern method.

As I've already mentioned, I got all of my ideas from Googling Bead Sprite designs.  When I was little, Bead Sprites were most certainly not this cool.  We made simple coasters with almost no design.  Or we made bracelets.  We did not make works of art.  Some of the designs I saw in my Google search were so elaborate and detailed they were not appropriate for my panel, but I encourage you to check them out with your own Google searches because they are quite fantastic.

For my patterns, I specifically got my ideas for these patterns from these sites:
There were so many options to choose from on my search, but in the end, these blog entries presented simple items that I thought were easy to understand and reproduce.  Plus, Nintendo and Mario Bros is Just Cool!

Now, on to the tutorial:

First, you need the right tools.  Here I have pictured my tools.  My regular needle nosed pliers have been with me for years in various projects, the other three are new since this beading hobby of mine is new.  Most needle nosed pliers actually have wire cutters built in them, but I would still recommend you purchase some small wire cutters anyway.  There are many situations where those needle nosed pliers won't do the job.  The wire cutters can get in to smaller spaces.  I also recommend narrow needle nosed pliers.  Even if you don't think you will need them, they are much better in more delicate situations.  Plus, sometimes you will need to use a pair of pliers in each hand to pull wire through tight beads.  Those purple pliers are for rolling and looping wire.  I use them more than the second pair of pliers.  Pliers will be your most expensive investment in this particular beading project.


Many people in the panel asked me what kind of wire I was using.  You can get many gauges of wire at your local craft store.  Use the smallest gauge.  And remember, the larger the number, the thinner the wire.  The day I went wire shopping, the smallest gauge I could find was 24 gauge.  I found this 28 gauge wire at Home Depot in the picture hanging accessories aisle.  It's my favorite.  And I recommend using wire as opposed to thread for this work because thread is flimsy and you have to use needles and be more careful with the beads buckling.  With wire, you just need the wire, beads, and pliers and the object holds a shape better.


The beads you are using are your basic run of the mill seed beads.  You can purchase them for under $2 a package at your local craft store and they come in all sorts of colors.


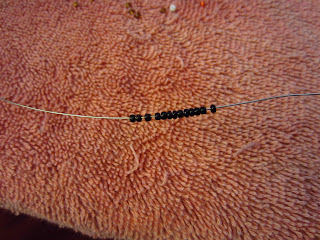
Now let's get started!  Threading beads with wire is easy.  You just insert the end of the wire into the seed bead opening.  Here's where your pattern comes into play.  For the first (meaning the bottom) row, thread the entire count of beads onto the wire and let them fall all the way to the center of the wire.


Like so.  Pretend you can see the ends of this wire and the meet up in the middle so the sides are even.


For the second row, thread all the beads for that row in the pattern just like you did the first row, except stop them from falling very far down the wire.


Now you are going to pick up the end of the wire on the other side and thread it through the beads like so.


Your object is to work the wire and beads so that you have opposite ends of wire coming out of each side of the row.  Be aware that some seed beads suffer from having smaller openings.  Sometimes you will have beads that cannot be double threaded like this.  So it would be a good idea to eyeball each bead and try to determine the smaller opening beads to discard for this project.  Otherwise, you will spend a bunch of time threading, then taking the row apart, then picking new beads, then re-threading.  It's a pain.  I speak as someone who keeps forgetting to cull small beads and pulling my hair out over this often.


Here's where your pliers may come in handy.  If the fit is tight on these beads, you'll need the pliers to help you grip and pull the ends of the wire.  You want to pull the ends so that the new row of beads moves down towards the already completed row.  Make sure you are pulling each side equally.  You still need each side's length of wire to be relatively the same.  You don't want to have to start over because you let one side get too short.


Pull the wire as tightly as you can.


Here you see me using my thumb and fingers to manipulate the bottom row from a curve to a line.  This only happens during the first and second row construction when you are making square pieces.  You shouldn't have to manipulate rows on square pieces after this.


Here you can see where I've made a third row.  I made that row by duplicating the instructions for the second row.  In a square piece, this is really easy because you are just counting beads according to the pattern.  Be aware that if you have beads which differ wildly in width, you may need to adjust bead count in the pattern for that discrepancy.


This is my near finished Domo.  As you can see, he is not perfectly square.  This is for several reasons.  First, I messed up one of the red bead rows and shorted it.  I decided to leave that in so you could see how missing beads in the pattern can affect things.  But that's not the only reason Domo is distorted.  Some of the rows have differing size beads.  You can tell this the most on the bottom tooth row.  Those white beads are smaller.  The same thing happened with my Ankh at the top of the blog post.  I actually even tried to adjust the bead counts in some rows to account for smaller or larger beads.  If you really want your projects to look perfect, you should pick through your beads at the start of the project to attempt to keep bead size uniform.  You're already picking through to choose for large opening sizes, you may as well pick through for uniform size as well.


Now to finish our little Domo, I use the clothes hangar method.  I pinch together the remaining wire...


and then twist.


Then cut the excess wire and use the rolling pliers to bend the twisted wire into a loop.


These more narrow needle nose pliers are great for pinching the loop together.


Then all that's left to do is to clip the excess wire away and thread some ribbon or chain through your new pendant.  Or if you are making earrings, thread the wire through the loop end of the fish hook earring before you clamp it down and then as you are clamping down, twist the pendant loop so your earrings hang properly facing forward.


Now you have your own pixel bead art!  And how simple was that?  Once you are comfortable with the process, here is a website with a few more Bead Sprite patterns you can work with.  And Pixelgasm has even more fun ideas you can convert from Bead Sprites.  If you're feeling really confident,  you can also try your hand at making patterns for little Kaos.  This site doesn't have the grids set up, but the kaos are small and simple enough that if you can make the Mario Mushrooms in my pattern, you should be able to figure out how to pattern some of the kaos.  To start patterning, all you have to remember is to keep it on a grid.  And each bead should represent one square on that grid.  Easy Peasy!

Happy Beading!

Thursday, March 24, 2011

All-Con 2011 Recap

Wow, What a weekend!  There are parts of me and my habitation that are still recovering from that whirlwind of fun.  The folks at All-Con really pulled out all the stops this year.  There was excitement and entertainment well into the early hours of the morning and somehow we all woke up mostly on time and did it all again.

This year the DFWCG participated in three panels.  I have to say they were all a success.  Thank you to Everyone who came to our panels and double thank you to those who ran those panels!  We could not have been a success if it was not for either of you.

Friday we took it easy.  Jennifer Kubenka and Coleen Swafford were at All-Con early so they got our table started while I was still at work.  Thank you Very much Crandall for getting our information together so that they were able to do that!  We saw some great costumes and talked to a lot of cool people.  And some inventive people too!  Check out this Dalek interpretation:


Once the time came to shut down the tables we all broke away and then Coleen and I came back to enjoy the Dr. Horrible Sing-a-Long Blog screening.  I opted to come in Dr. Horrible costume along with a few others, but I was the only one representing the red lab coat.


Founding Member Traci Baker glammed it up in her new PVC corset outfit on Friday night.


What a great way to kick off the first night of the con!  

Saturday we were up and at 'em early as we had our knitting panel first thing.  Last year we had a large group of people who all wanted to learn how to get started.  This year we had a smaller group learning, but over all we were of differing levels.  Regina came to be our expert again.  And as usual she was fantastic and very funny.  We had another Regina drop by to show us how she spins fibers into yarn.  She's from Rose Path Weaving in Lindale, TX.  Our instructor Regina spoke very highly of this shop's yarn selections.

One of our knitters was brave enough to try making our little Jayne Hat Pin that Laura put together for last year.  We were all so busy learning last year that we never got around to making them so I had lots of leftover supplies.  The rest of us learned or practiced our basic knitting.


Our next panel on Saturday was the Fabric and Pattern Swap.  Each year this panel has grown.  I remember the first year when there was only two of us who participated.  This year, we covered nearly every table with swap items.  How fantastic is that?


We moved a lot of fabric and patterns during that swap.  Of course we also had so much more that wasn't taken home.  Although at first I was a little overwhelmed with the amount we had left and what on earth I was going to do with it, I have since decided to donate the remaining swap items to a local theater program or school.  Now I just need to choose where to donate.

During the swap, I met two ladies who are making some interesting innovations in dress forms.  They're Epps & York Apparel & Accessories.  And they make custom dressforms to mimic soft tissue.  In layman's terms, they squish better than a Uniquely You foam form.  They didn't have any forms on hand at this con for us to look at, but I am hoping we can see a sample some time soon.

Saturday afternoon was our beaded jewelry panel.  Our Treasurer Rondinella was gracious enough to be here  from Austin after her time at Gulf Wars in Mississippi to put this panel on.  She was also gracious enough to donate the supplies for the panel so people could go home with something they made instead of just watching a demo.  So a Huge thanks goes out to Rondinella for her contribution on Saturday!  Here's a sampling of what went down in the panel.


At posting, Rondinell hadn't had a chance to sort through her photos she took of the finished products.  I hope to have her photos to showcase soon.

The Beaded Jewelry panel closed out our panel participation for the day, but over at the club table we continued to see some amazing costumes.

 This family was a major favorite walking by.  It's so great when the whole family can participate.

And this Yellow Lantern Scarecrow looked really awesome up close.

I'm not sure what costume this is, but it also looked really great up close.

We officially wrapped up Saturday's club table in the evening so we could all break for dinner.  After that some of us rested and enjoyed the vacation of the hotel.  Others of us played well into the night and early morning hours taking advantage of the extended programming All-Con provided this year.

Sunday was to be a day spent just sitting behind the table and wrapping up our connections with new people. But at the last minute we were asked to sit on a panel about Master Level Costuming as the panelist couldn't make it.  That gave me a chance to sit on a panel with Cynthia, who also was a great help lending us a dress form for costume displays.  We all had to think quickly on our feet to fill the time, but I think the panel attendees were able to come out of the room with some helpful information.

I have to say that out of the 3 years the DFWCG has participated with All-Con, this year was my favorite.  I had anticipated a great time as soon as I saw the theme and I was even more excited about it as soon as I started to see the panels fill in on the schedule.  2012 has some big shoes to fill.  But considering the theme, I think we're in for another wild ride.  See you guys next March for "The End of the World"!


Monday, March 14, 2011

All-Con 2011 is almost upon us

Are you ready?  Have you rifled through your costume closet and found enough to put together a suitable wardrobe for 3 days of costuming?

If you're anything like me, your house or apartment is an absolute explosion of fabric and thread due to the last minute ideas and the refusal to be seen in "that same costume for a third time."  This last week my living space was transformed into a veritable sweat shop so I could fix items that were torn, or alter items to better mix and match.  I nearly finished one costume only to realize that what I really needed to finish was a large boarder at the bottom of the skirt.  And I almost altered a costume which was too big only to decide that if I took the fringe off of it and hacked away at an old brides maid's dress, the whole look would be infinitely better.

Am I finished?  No.  Of course not.  This week I finalize closures and rifle through what's left of my make-up stash that survived a bit of an apartment disaster.  And I start getting creative with my hair.  I have several ready to wear wigs, but I think for my steampunk I'm going to play with my new extensions for a fresh hair style.  I think I'm most excited about my Steampunk outfit.  It's Steampunk Light, but it's cute and is an example of how a person can take some regular closet items and cobble them together with other costume pieces for a decent Steampunk look.  I can't wait to share it!  Needs a hat though.

But it's not just the costumes I'm excited about.  For the third year in a row the DFWCG is presenting our Fabric and Pattern Swap.  Each year this swap has grown just a little bit more in size.  And I've heard that this year we should have some very interesting fabrics offered.  There's also going to be patterns and trims.  If you didn't stop by last year, you missed the opportunity to snag 2 yds of nice Italian silk.  Who knows what jewel will surface this year?  And remember, you don't have to bring something to take something.

We're also reprising our Knitting panel.  We had such a great time learning last year that we decided it would be fun to meet up again to see what everyone's been up to.  We've got instructors on hand for anyone who needs to learn from the beginning or who needs to refresh their lessons.  We will have extremely limited supplies for those who want to learn, but aren't ready to buy their own supplies.  Since those supplies are limited, we encourage you to go ahead and bring your own.  The supplies list for beginners wishing to learn is:


1. US 7, 8 or 9 needles - Hobby Lobby has great short 'learner'-type needles made by Red Heart in sizes US 7, 8, and/or 9, for a couple of bucks a pair - they're called 'basics' or 'learners' and come in red, blue and yellow, respectively

2. A light-colored yarn.
  a. Sugar and Cream dishcloth cotton, or
  b. Sinfonia cotton, or
  c. a non-novelty acrylic yarn (smooth yarn without any frou-frou crap in it - makes the stitches more defined and clean, and easier to see and understand), or
  d. Inexpensive yarn options available at big box stores:
    1. Red Heart Super Saver,
    2. Patons Classic Wool
  e. Yarn store options - reasonably inexpensive, and available in many colors:
    1. Cascade 220 (100% wool)
    2. Encore Worsted (acrylic/wool blend)


3. If you want to try to make some Jayne Hat pins to donate to the Austin Browncoats, also bring a pair of US size 3 or 5 straight needles. We have the instructions and the yarn supplies.


4. Patterns and projects to discuss.


For those who are a little more experienced, please feel free to bring anything you want to finish or for show and tell.  Like a proper knitting circle, we welcome folks of all levels to chat and work together.


And lastly, we have a special beaded jewelry panel that I'm excited about.  DFWCG Treasurer Rondinella is going to be showing us all how to make our very own beaded jewelry.  She'll lead you through tools all the way to construction of a basic piece.  I can't wait to see how this panel goes!


We hope to have enough room around our table to have some costumes on display again this year.  And we'll have some books out  for con-goers to look at.  I'll also have my camera out and I'll be handing out lanyard tags to wear with your badges.  So make sure you drop by to see us during the weekend.  We'd love to photograph you in each of your costumes and get to know you.  And also please let us know what kind of panels you'd like for us to offer for future dates of All-Con.  With your help, we would like to continue to build our con activity each year.

Tuesday, February 1, 2011

Harajuku fashions for historical costumers

When I first heard about the costume guild's upcoming Tokyo Pop event, my first thought was: "sounds like fun, but what on earth would I wear!?!"  Since I mostly focus on historical costumes and have no interest in anime, I was worried that this event might not hold any interest for me costume-wise.  But then I started looking into Harajuku street fashions, and I was amazed by how many diverse and historically influenced styles there are to choose from.  I'll share some of the info that I've gathered in my search this past month, and maybe it will give some of you other folks who are new to this cultural phenomenon a place to start as well.  Here is a quick rundown of some of the major styles that might appeal to those of us who are beyond our teenage years and looking for something more historical than anime for inspiration:

Visual Kei - a style inspired by Japanese rock musicians that is characterized by the use of elaborate costumes, make-up, hairstyles and costumes. The look often has a very androgynous feel.  Think 80's glam rock, but even more theatrical. Most of the rock bands are made of guys who look like girls, but the Harajuku visual kei style is mostly made up of girls dressing up like their favorite rock guy (who dresses like a girl).  Got it?  ;)  A lot of the visual kei looks are very modern punk or goth looking with a hard edge, but others are more "pretty" and historically inspired.  The Japanese visual kei band Versaille has some especially fun looks ranging from 18th c. through Victorian.


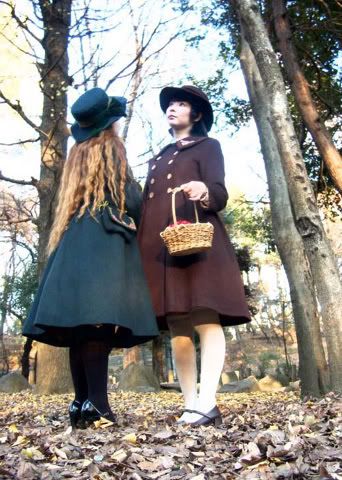
Gothic Lolita (also GothLoli) - this style is characterized by lots of Victorian-inspired black and white clothing, short flared skirts, anything with ruffles or lace, elaborate hats, veils, and bonnets, oversized handbags, parasols, stockings, and platform shoes.  The wearers often try to invoke the "cute" looks of children or porcelain dolls... but with a gothic edge to it.  Victorian blouses, corsets, and accessories fit in well with this style.


Classic Lolita - This style is a more mature and less "cute" version of the loli look.  The silhouette is similar, but the dresses can be more A-lined or princess cut, and there aren't nearly as many ruffles or frills.  This style also uses more variety in colors and some floral patterns, and the accessories aren't as costumey.  A lot of 50's looks would work really well for this style.


Elegant Gothic Aristocrat (EGA) - Again, a more mature subset of the gothic lolita style with an emphasis on historically-inspired elegance.  Colors are still predominantly black and white, but skirts are often tea or floor length and slimmer, and long tailored jackets are common.  The style is very androgynous at times, and you often see EGA outfits that make use cravats, tophats, or walking sticks, but corsets and traditional Victorian womenswear is common as well.   This style has a lot of similarities to the gothic fashions that we have seen in the US for decades now.


Pirate Lolita (PirateLoli) - Another loli subset that combines eye-patches, tricorns, frock coats, and other pirate garb with the short, flared loli skirts.  Arrrr... so piratey, and cute!  If you've ever made a pirate costume, you probably already have some pieces that would work well for this one.


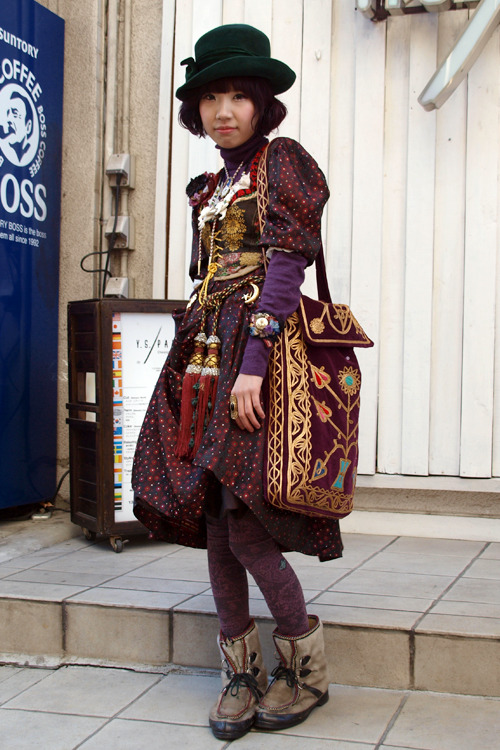
Dolly Kei - This style uses a lot of vintage garments, extreme layering, and Eastern European or gypsy styles to create an rich and eccentric combination.  Pretty much anything goes with this look!  It is very bohemian-looking.  I could see a lot of Renaissance faire garb working well with this style - especially when combined with other thrift shop or vintage pieces.  


Mori Girls - This style is supposed to look like the wearer would be at home in an enchanted forest.  Colors are light and neutral, and the clothing is layered and loose fitting.  Victorian or Edwardian petticoats or camisoles, 1910's lingerie dresses, neutral colored shawls, vintage fur stoles, and earthy 70's clothing all could be used as staples of a good mori girl outfit.


I hope that gives you historical costumers out there a few more ideas to get you inspired for our Tokyo Pop event.  Once you know the names of the styles, it is easy to look for more pictures and webpages dedicated to these fashions on Google, Flickr, Tumblr, LiveJournal, or elsewhere.  The hardest part for me was just knowing what to look for in the first place!

I have tried to focus my search on styles that have a historical influence and that would be more appropriate for adults, but there are TONS of other Harajuku styles that are more modern and youthful.  The main thing that I have learned about Harajuku fashions is that creativity and personal style is treasured, and there are no hard rules for anything.  If you don't like any of these styles, create your own!  Who knows, you might start the next Harajuku fashion trend!

Easy Anime Costuming

In honor of the upcoming All-Con and Tokyo Pop events this spring, we give you a guest post by Coleen Swafford on easy anime costuming:

My daughter loves anime and anime costumes.  I have made 3 so far and thought I would share what I have learned.  Since I don’t watch as much anime as she does, I rely on pictures she supplies and any additional details that she feels are relevant. Obviously, the important thing is to come up with something that is easily identifiable as the character. Materials and methods are of less importance.

All three of the characters she requested are from Naruto. The first costume was to be Sasuke. She gave me these pictures. Well, this outfit was pretty easy. I made knee length baggy white shorts. For the top, I went through my patterns until I found a blouse with a stand up type collar, then over exaggerated it. I made the top large and pull on. Then I cut out the fan shape and appliquéd it on the back. The arm bands were white cotton with elastic in the blue end pieces. We polished it off with a cheap wig found on ebay and a headband we found there as well. Footwear was our biggest problem. They don’t sell toeless ninja boots at Target. But we did find knee hi toeless socks there and paired them with a pair of black slippers.


The second character was Sakura. For this outfit, I decided to see if I could find part of this at thrift shops. A trip to Goodwill netted me a short pink skirt and a red sleeveless tank. I opened the side seams on the skirt and made small straps with fake buckles on each side. A pair of bike shorts worked well under the skirt. Since it wasn’t necessary to have the top unzip, I bought a long white zipper and sewed it on the outside. I could have bought soccer pads for her elbows but instead made them from old sock tops. Some black gloves, the Saskue footwear, and another cheap Ebay wig and I was done.


The third character was TenTen. I decided to make this one from scratch. I found a pants pattern that had cut down pockets. I made the pants out of burgundy cotton. I used white cotton for the inside of the pockets and made the lines with rows of stitching. Then attached a grey strip of fabric over them. I finished the legs of the pants by blousing them mid calf.  I’ll admit the jacket didn’t come out exactly as I wanted. I probably could have found a store pattern for this but instead used a Chinese jacket I found at Goodwill. The jacket was too small and the wrong color, so I took it apart and used it to make larger pattern pieces. I didn’t get the neckline totally right but it was enough that anime enthusiast recognized exactly who she was at Anime Fest.